
How to control an LED pixel strip (WS2812B) with an Arduino and the FastLED library Michael
In this tutorial, we are going to learn how to use Arduino to control WS2812B RGB LED strip. With a single Arduino pin: Arduino can control the color of each LED on the led strip individual Arduino can change the brightness of each LED on the led strip individual Hardware Required Or you can buy the following sensor kit: 1 ×
Arduino and WS2812b example Arduino Learning
In this tutorial, you will learn the features and specifications of WS2812B LED strips and How to control WS2812B individually addressable LEDs using an Arduino board. After this tutorial, you can control the color of each LED individually, which allows you to produce exceptional and complex effects simply. Overview Hardware components Software

How to control RGB WS2812B LED 32x8 matrix with an Arduino Tutorial YouTube
This tutorial is aimed at getting some instant gratification from your WS2812 LEDs (also known as NeoPixels). I'll briefly cover a bare-bones setup for Arduino. If you've never used an Arduino before, we've got you covered with our free, online Arduino Workshop for Beginners.

Arduino WS2812B Tutorial (16x16 256 LED Test) YouTube
If you're like me, you've been looking around the internet for a good tutorial on using the ESP8266 with neopixel LEDs (AKA the WS2812 or WS2812b), programmed via the Arduino IDE. I haven't found it all in one place, in English, but it turns out it's pretty easy now - much better than a few months ago.
How to Control WS2812B Addressable RGB LEDs using Arduino Circuit Geeks
The pin configuration details are listed below in the tabular form: WS2812B RBG LED Features and Specifications Power supply voltage (VDD) : +3.5 to +5.3Volts Input signal voltage : -0.5 to VDD+0.5Volts Input signal current: 1uA Supply Capacitance: 15 pF Operational Frequency: 400Hz Data transmission speed: 800Kbps

/dev/Arduino 6 Diody RGB WS2812 WS2812B Arduino, Arduino projects, Arduino sensors
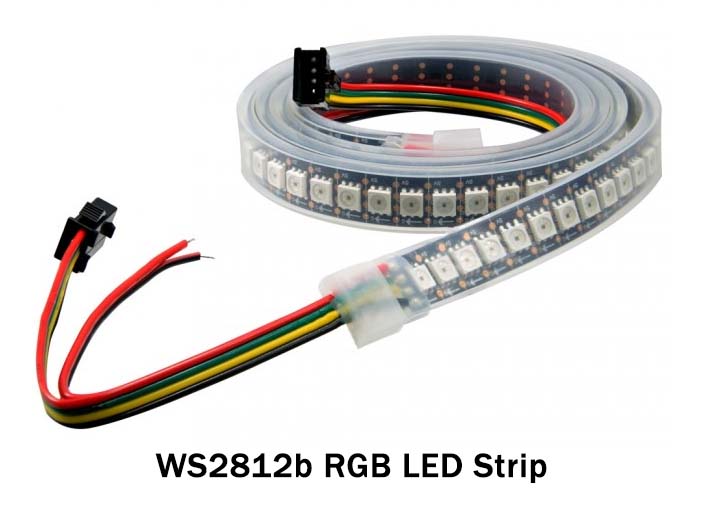
Code Arduino and WS2812b example WS2812 family is a intelligent control LED light source that the control circuit and RGB chip are integrated in a package of 5050 components. It internal include intelligent digital port data latch and signal reshaping amplification drive circuit. effectively ensuring the pixel point light color height consistent.
Mengontrol WS2812B LED Panel Dengan Arduino Paulus Tanuri
WS2812B LED Protocol and LED Microcontrollers. In the last few years, programmable LED lights like the WS2812B LED have taken the illumination world by storm. These tiny modules pack separate red, green, and blue LEDs into a 5mm x 5mm, package, and they also contain a control chip so small that it's hard to see with the naked eye.

Guide For Ws2812b Addressable Rgb Led Strip With Arduino Arduino Images
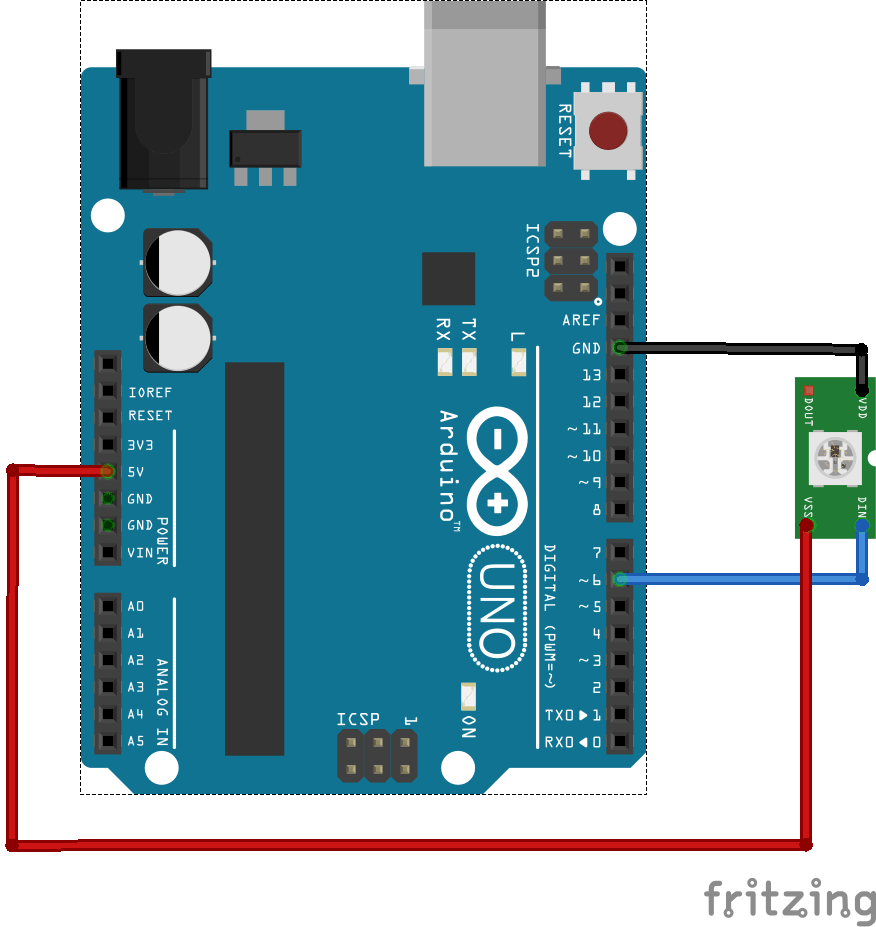
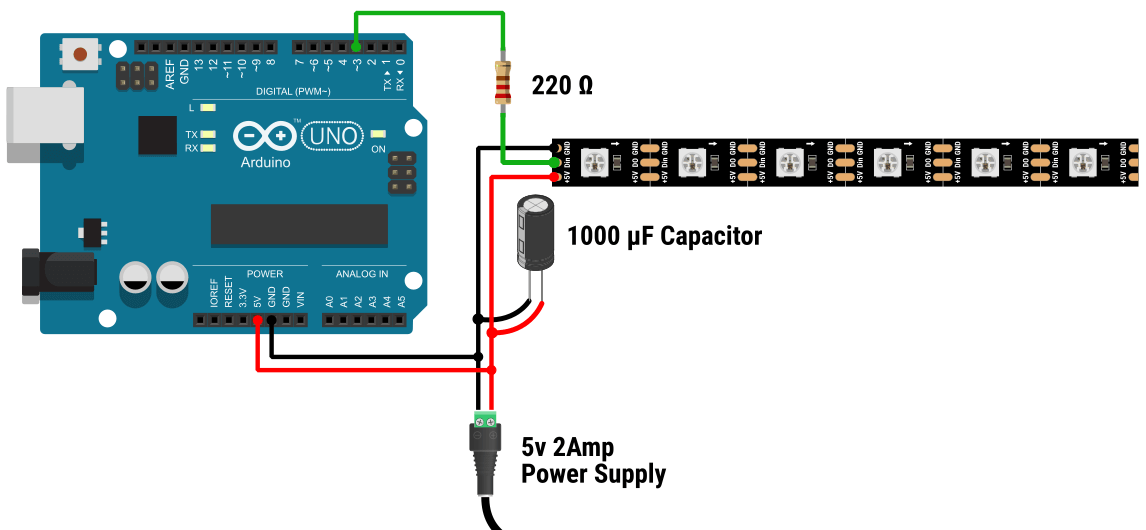
Schematics In this example, the WS2812B LED strip will be powered using the 5V Arduino pin. In my case, I'm controlling 14 LEDs. If you want to control many LEDs, you'll need to use an external power source. Useful tips: Connect a capacitor with a capacitance between 100uF and 1000uF from power to ground to smooth out the power supply.

How To Control WS2812B Individually Addressable LEDs Using
Click on Add Led Strip after entering the website. Click on the added NeoPixel Strip and specify the number of LEDs and Arduino pins. Click on the Add Effect in the loop part and choose an effect. Apply your preferences in the Animation and Color sections. Click on generate Arduino code and copy the generated code to Arduino IDE.

Easy Addressable LEDs with Arduino! WS2812B Tutorial YouTube
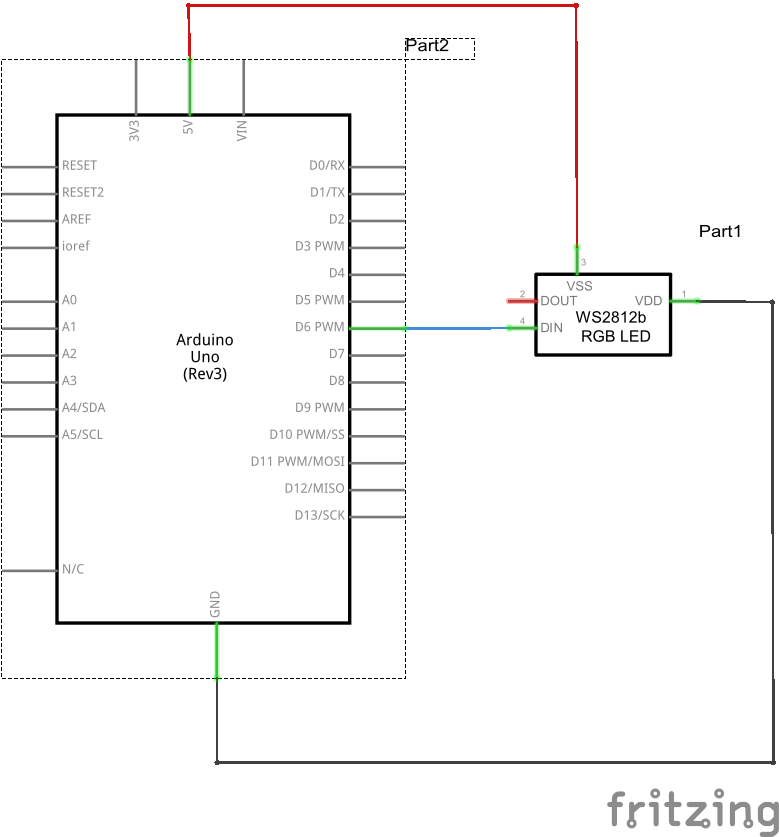
The following image shows connection between Arduino UNO and the WS2812B RGB LED Strip. The 5V of Arduino UNO and the LEDs are connected to an external power supply along with the GND (VSS). The DIN pin of the LED Strip is connected to Digital IO pin 7 of the Arduino through a 330Ω Resistor. Components Required. Arduino UNO; WS2812B LEDs
How to Interface WS2812B Addressable RGB LED Strip with Arduino UNO
Input voltage: DC 5V LED resource: WS2812B LED (SMD 5050 RGB LED with the built-in improved version of WS2811 IC) Power: 60LEDS/M—-18watt/M FPCB Width: 60LEDS/M—-10mm Ingress Protection: IP30 Non-waterproof IP65: Waterproof in Silicon Coating Colours: Full-color RGB, dream colour changing

Arduino Project 22 WS2812B RGB LED Brightness Control & Color Mixing [Using 10K
Step 1: Parts and Tools Used Parts : 1. 8 x 8 Neo Matrix ( Banggood ) 2. Arduino Uno ( Amazon ) 3. 5V /2A Power Supply ( Amazon ) 4. DC Jack ( Amazon ) 5. Jumper Wires ( Amazon ) 6. 8 x 32 Flexible WS2812 Matrix ( Sparkfun ) Tools : 1. Soldering Iron ( Amazon ) 2. Wire Cutter / Stripper ( Amazon )

How to drive WS2812B Addressable LEDs using Arduino
2.4K Share 90K views 2 years ago #WS2812b #LED #arduino The best, most thorough tutorial for getting started with the FastLED library, a WS2812b light strip, and an Arduino Nano. This.

Ws2812b with arduino YouTube
In this example, we will power the WS2812B LED strip using Arduino's 5v output pin. Here we are using 8 LEDs. You can power up to 10-12 LEDs using Arduino's 5v output pin.
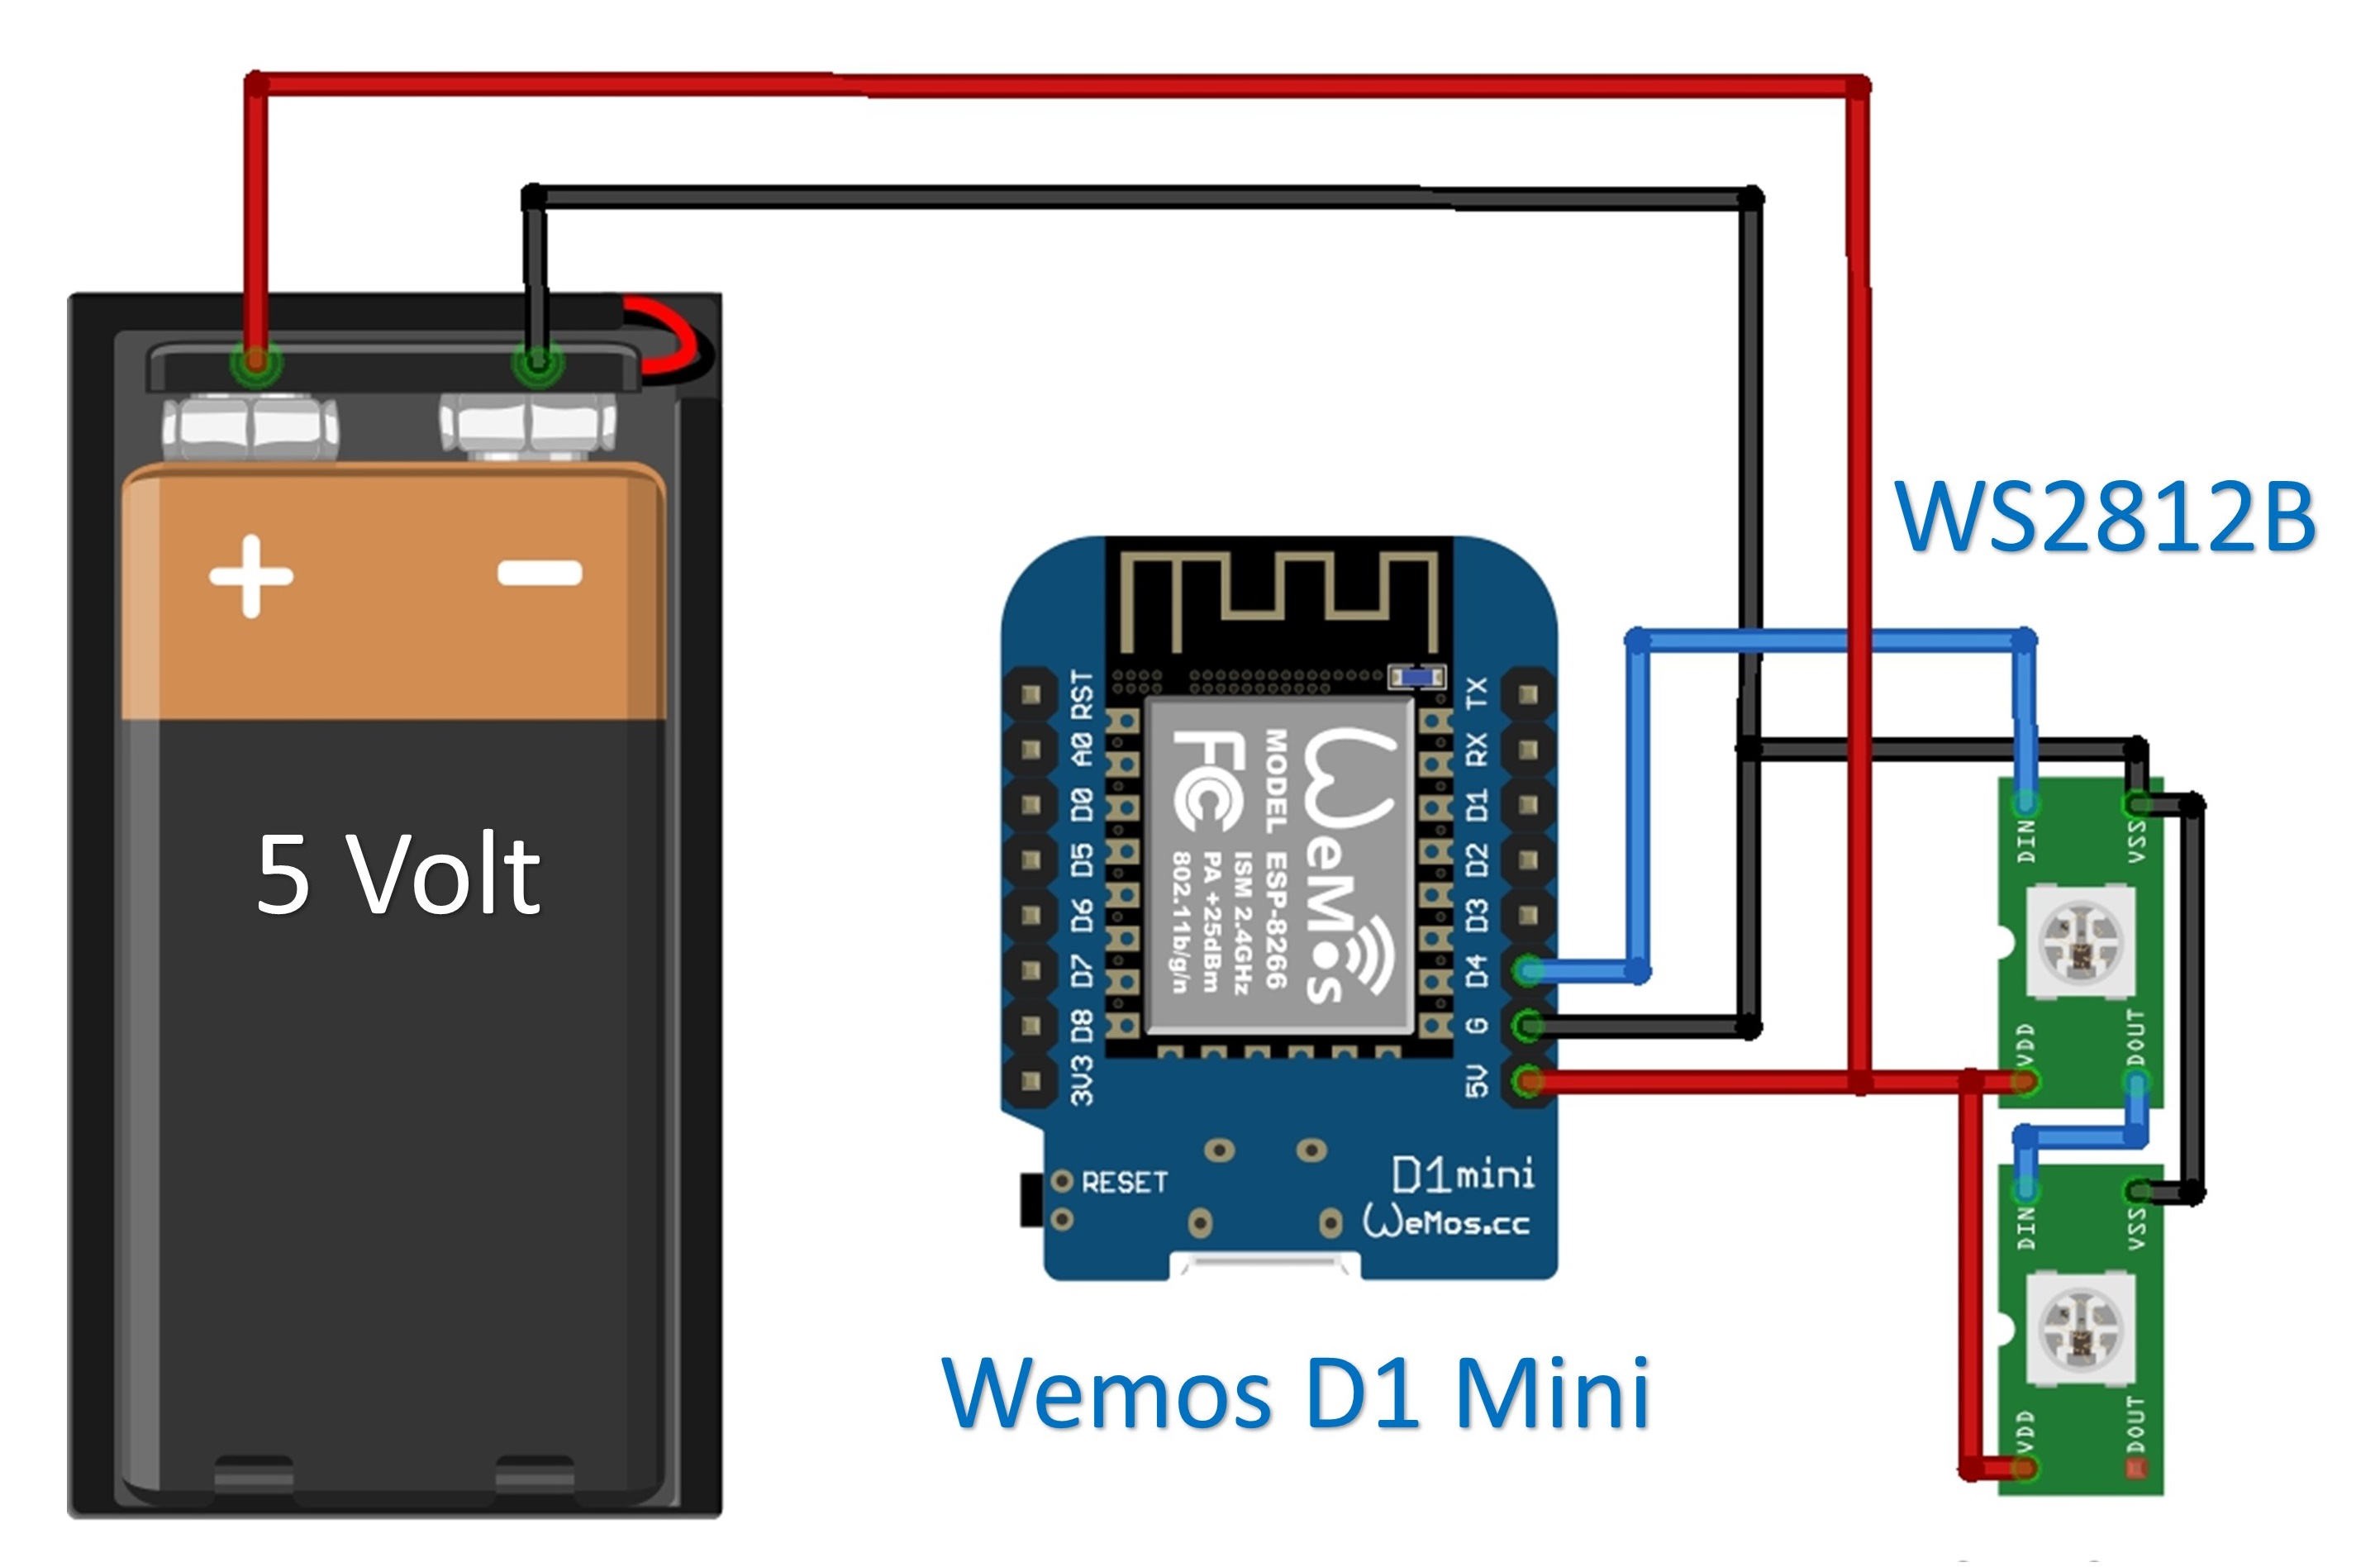
Semiconductors & Actives RGB LED Shield WS2812B Wemos D1 Mini IOT Blynk ESP8266 Arduino Node Mcu
Code Explanation Ex.2: WS2812 Blinking Mode with Arduino Ex.3: WS2812 Fading Mode with Arduino Ex.4: WS2812 Random Mode with Arduino Ex.5: WS2812 rainbow mode with Arduino What's Next? Similar Tutorials Overview Which feature of RGB LEDs has made them an attractive and practical component in Electronics and Lighting Industry?
Arduino and WS2812b example Arduino Learning
Don't forget to connect the power source ground to the Arduino ground if you're using an external power source. Schematics. The WS2812B LED strip will be powered in this example using the Arduino's 5V pin. In my case, I'm controlling 14 LEDs. You'll need an external power source if you wish to control a lot of LEDs. Useful tips:
